Table of Contents
<del> And <ins>
The <del> element of HTML represents a text has been deleted from the document. When you use this element it makes a strikethrough on the deleted element. Moreover, the text will not be deleted from the html document but a user can understand that this text is deleted because it looks different from others.
On the other hand, if you can use <ins> element to replace the deleted text with the new text and that new text will have a underline.
The <del> element has two attributes, one is cite which tells the reason of deletion but user can’t see it and other one is datetime to tell the time of deletion of text.
The example of <del> and <ins> element –
<div>
 <blockquote>
  If you would like to learn the structure than start learning <del cite="HTML is a structural language">CSS</del> <ins>HTML</ins>,  whereas <del>HTML</del> <ins>CSS</ins> will teach you how to style the html elements.
 </blockquote>
</div>
The output is –

Embed audio with <audio> element
Suppose you want a user to play audio with just one click on your website or app. Then, the <audio> element in HTML5 becomes a problem solver for you.
The <audio> element makes it possible to embed any audio file to your website. Moreover, It comes with default user agent controls, and for that, you have to assign a controls attribute inside the tag. Controls means a user can play, stop, increase, decrease and mute the audio.
Another essential attribute of the <audio> element is src which contains an address or location of an audio file. This works like same as the src attribute in the img element.
Example of <audio> element with src attribute.
 <div id="code-output-box">
  <p>Pls play the audio</p>
  <div>
   <audio controls src="https://codedrizzle.com/wp-content/uploads/2021/12/leopard7.mp3">
    <p>Your browser does not support the HTML5 Audio element.</p>
   </audio>
  </div>
 </div>
The Output is –
Pls play the audio
Moreover, You can also assign an alternative source element in the audio tag where src attribute is assigned to the source element. However, the result or output is the same.
Example of <audio> element with alternative source element.
<div id="code-output-box">
 <p>Pls play the audio</p>
 <div>
  <audio controls>
   <source src="https://codedrizzle.com/wp-content/uploads/2021/12/leopard7.mp3"></source>
   <p>Your browser does not support the HTML5 Audio element.</p>
  </audio>
 </div>
</div>
The output is –
Pls play the audio
You can also use other HTML attributes for <audio> elements such as loop, autoplay, preload, and muted.
Elements inside the audio tag work as fallback in case browser does not support audio element
Convert a text into beautiful quotation with <blockquote> element
The <blockquote> HTML element represents a text which looks different from other text on the website because it indents the text while rendering. By default a <blockquote> has the margins of 40px from left and and right, 18px from top and bottom as per writing mode, direction and text-orientation properties.
If you want to explain where this quote has taken, you can use the cite attribute to refer to the URL in the element.
Example of <blockquote> element
<div id="code-box">
  <figure>
   <blockquote cite="https://www.success.com/22-inspiring-quotes-about-freedom">
    <p>The only real prison is fear, and the only real freedom is freedom from fear.</p>
   </blockquote>
   <figcaption>—Aung San Suu Kyi</figcaption>
  </figure>
</div>
The Output is –

Now you will thinking why it has indentation. as i told you it has by default margins. You can see in the below image.
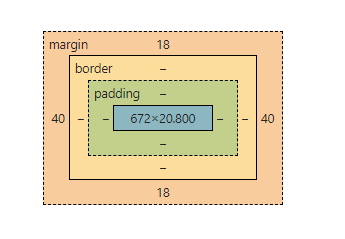
You can remove margins with CSS property of margin and even style it more.
Use <time> element to help search engines
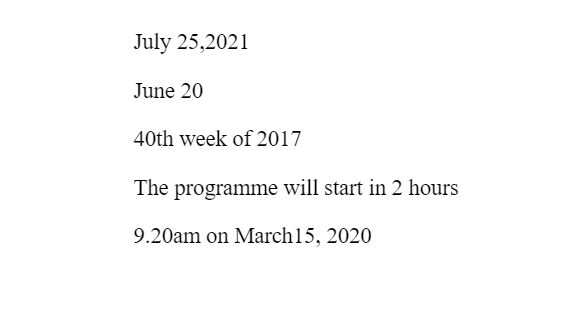
Usually, we try to write a specific period in minutes, seconds, or a date in a calendar, and we try to write in many different ways and formats. These formats and methods make search engines hard to understand the meaning of time and date with string and numbers.
For example
<div>
 <p>July 25,2021</p>
 <p>June 20</p>
 <p>40th week of 2017</p>
 <p>July 25,2021</p>
 <p>9.20am on march15, 2020</p>
</div>
The above time and date formats are hard to understand for a search engine. The <time> element can convert a time or date format into machine-readable form with the help of a datetime attribute and creates meaning for search engines.
All you have to do is write these dates and times within time element with datetime attribute in a format. For example, July 25, 2021, will be written in standard format as 2021-07-25(year-month-day).
Example of <time> element
<div>
 <p><time datetime="2021-07-25">July 25,2021</time></p>
 <p><time datetime="06-25">June 20</time></p>
 <p><time datetime="2017-W40">40th week of 2017</time></p>
 <p>The programme will start in <time datetime="PH2">2 hours</time></p>
 <p><time datetime="2020-03-15T9:20.00">9.20am on March15, 2020</time></p>
</div>
The Output is –
<picture> element
You know that to change the size of an element as per the screen size, we typically use media queries. The <picture> HTML element gives us the flexibility to write the media queries on the HTML document. The <picture> element helps you change the image size according to the screen size by allowing media queries inside the source element.
You can have zero and one source element and the one img element that works as an alternative if the browser does not support the source element. You have to use the srcset attribute, which contains the address of the image.
I have used three source elements for three different window sizes and an img element for fallback
Example of <picture> element-
<picture>
    <source srcset="https://codedrizzle.com/wp-content/uploads/2021/12/laptop-large-image.jpg" media="(min-width: 800px)">
    <source srcset="https://codedrizzle.com/wp-content/uploads/2021/12/laptop-medium-image.jpg" media="(min-width: 600px)">
    <source srcset="https://codedrizzle.com/wp-content/uploads/2021/12/laptop-small-image.jpg" media="(min-width: 300px)">
    <img src="https://codedrizzle.com/wp-content/uploads/2021/12/laptop-small-image.jp" alt="laptop-img"/>
</picture>
When the screen size has min-width of 800px, users can see the large size of the image as in the below image.

When the screen size has min-width of 600px, users can see the medium size of the image as in the below image.

When the screen size has min-width of 300px, users can see the small size of the image as in the below image.

Show the progress with <progress> element
The <progress> element in HTML makes a blue color bar by default. This element is basically used to represent a user’s success rate or your progress in a specific area. The length of the blue color depends on the value attribute.
Morover, the <progress> element uses value attribute to represent the length of green color in a bar and max attribute to represent how much a task is to be completed. The max attribute value should be more than 0.
Example of <progress> element
<div>
 <label for="comp-progress">your progress in this task:</label>
 <progress id="comp-progress" max="100" value="40">40%</progress>
</div>
The Output is –

Represent three stages with <meter> element
Like progress, the <meter> element represents a progress bar, but it contains two attributes. One attribute is low, which is the minimum scale. If the value attribute value is less or equal to the low attribute’s value, the bar color will become dark orange.
Example of <meter> element with value attribute less than value of low attribute –
<div>
 <label for="rain">chances of rain:</label>
 <meter id="rain" min="0" max="100" low="33" high="66" optimum="80" value="32">65%</meter>
</div
The output is –

The second attribute of the <meter> element is known as high, which describes the highest value. If the value attribute value is equal to or higher than the high attribute value, the progress bar color will change to green.
For Example of <meter> element with value attribute less than the value of high attribute –
<div>
 <label for="rain">chances of rain:</label>
 <meter id="rain" min="0" max="100" low="33" high="66" optimum="80" value="64">65%</meter>
</div>
The output is –

On the other hand, if the value is between low and high attribute values, the progress bar colour will be yellow.
For Example of <meter> element with value attribute greater than the value of high attribute –
<div>
 <label for="rain">chances of rain:</label>
 <meter id="rain" min="0" max="100" low="33" high="66" optimum="80"value="74">65%</meter>
</div>
The output is –

Describe a abbreviation with <abbr> element
The <abbr> HTML tag helps you to represent an abbreviation. This tag makes sense when defining content out of the normal document flow. In other words, a user can see the definition of a short form of a word on the page if you use the <abbr> element.
You can do this in two ways, either with a title attribute or without. First, we will create an <abbr> element without a title attribute when you don’t want to describe an abbreviation word.
Example of <abbr> element without title attribute –
<div>
  <p>First of all to learn code you have to learn HTML and after that to style the HTML elements you should learn CSS</p>
</div>
The output is –

The second way is to use the title attribute within the <abbr> element, which expands or defines the abbreviation. A user can see the short word’s definition in the form of a tooltip while hovering over that particular word and the dotted line under that word.
Example of <abbr> element with title attribute –
<div>
<p>First of all to learn code you have to learn <abbr title="HyperText Markup Language">HTML</abbr> and after that to style the HTML elements you should learn <abbr title="Cascading Style Sheets">CSS</abbr></p>
</div>
The output is:-

break a word with word break opportunity element <wbr>
The <wbr> HTML element known as word break opportunity element because this element has the capability to break a word, and start a new line. However, a browser will only break the line where it is applicable.
In other words, by using the <wbr> element, you are enforcing the browser to break a word and start a new line where you want.
Pls, note that the <wbr> element does not embed a hyphen at the end of the word break. However, you can use a soft hyphen character entity (­) to achieve that.
Example of <wbr> element –
<div id="wbr-paragraphs"> <p>Loremipsumdolositametconsecteturadipiscingelit</p> <p>Loremipsumd<wbr>olos<wbr>itametco<wbr>nsecteturadip<wbr>iscingelit</p> <p>Loremipsumd­olos­itametco­nsecteturadip­iscingelit</p> </div>
Pls note i have given the width to the div less than the usual to see the effect of <wbr>.
The output is –
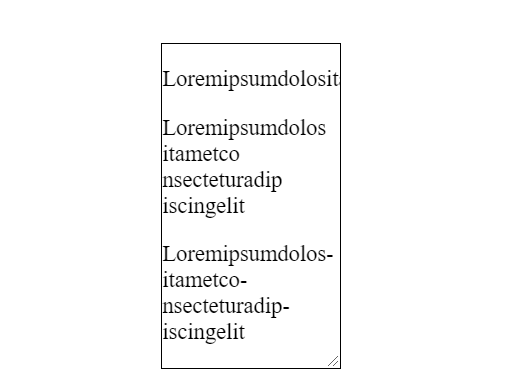
wbr element will only break the word when parent element has less width than the word length or when the window gets shrink.
Embed video with <video> element
The <video> HTML element helps you to embed a media player on your website. This element comes with default controls and a source element with the src attribute. The src attribute works in the same way as in the img element, where we have to provide the URL or address of the <video> element.
Moreover, you can provide a fallback between the video tags which will work when the browser does not support the video element. Video elements also come with powerful attributes such as autoplay, loop, muted, etc.
Example of <video> element –
<video controls>
  <source src="https://codedrizzle.com/wp-content/uploads/2021/12/file_example_MP4_640_3MG-1.mp4" type="video/mp4">
  <p>Your browser doesn't support HTML5 video. Here is a <a href="https://codedrizzle.com/wp-content/uploads/2021/12/file_example_MP4_640_3MG-1.mp4">link to the video</a> instead.</p>
</video>
The output –
Bonus – Try yourself in codepen
I have created a codepen with all the example where you can try yourself and practice more.
See the Pen 10 html tags that you don’t know by Jaspal (@jaspal9755) on CodePen.
Wrapping up
You can see that HTML has a variety of elements that can surprise you. Some of the above elements make your life easier. I will suggest you learn about these elements’ attributes as well because attributes make these elements more powerful and valuable. I have tried to cover up the elements you might not usually use in this article. However, there are some HTML elements that I haven’t covered; otherwise the article would be very long.